People Overview
The People page also organizes all your student groups, where you can manage student groups. You can create groups to put students together to complete projects or other activities. Students can set up their own groups, which will allow them to work collaboratively.

The People page displays all information about the users in your course. The page is designed with global settings at the top of the page [1] followed by the generated user data [2].

Global settings include searching and filtering by user data. To search for a specific user, type the user's name in the search field [1].
To filter by role, select the Roles drop-down menu [2]. The filter will also display the number of users in each type of role (e.g. student).
You can also add a user to the course [3].

To manage course-level user options, click the global Options drop-down menu. You can view user groups [1]. User groups are the same as displayed in the global settings at the top of the page.
You can view prior enrollments in the course [2]. Prior enrollments are students who were previously enrolled in the course and their enrollments have been concluded.
You can view registered services for each user in the course [3]. If a person has registered a social media account in Astria LMS, you can see that service listed and communicate with that person through any social media site they have registered.
View Users

The People page orders users alphabetically by last name. Search and filter results display the following data:
The user's name
Login ID
SIS ID - this column requires permission to view SIS IDs
Section - may be enrolled in more than one section
Role - if the user was assigned a custom role, currently only the base role is displayed
Last Activity - displays the date and time of a user's most recent interaction in the course. This time stamp updates when a user navigates through the course using the Course Navigation menu, replies to a discussion or submits an assignment or quiz, and when they access course files and pages. Please note that Last Activity does not include mobile interactions or group participation.
Total Activity - allows you to see how long students interact within a course and counts page navigation only. Total activity time is displayed in hours:minutes:seconds. If a user has not yet reached an hour of activity, total activity time is displayed as minutes:seconds. Total Activity records any time spent viewing course content that exceeds two minutes. If the time between a new activity and the last completed activity is under ten minutes, all time between these two events will also be included. Total Activity does not include group activity or page views for videos that do not include intermediate page requests, such as a half-hour recorded lecture. To view specific page views for a student, view the student's course access report.
Note: Viewing user details, including Login IDs and user email addresses, are course permissions. Depending on your permissions, you may not be able to view all available information in the People page. |
View User Status
You can also view the status for pending and inactive enrollments.
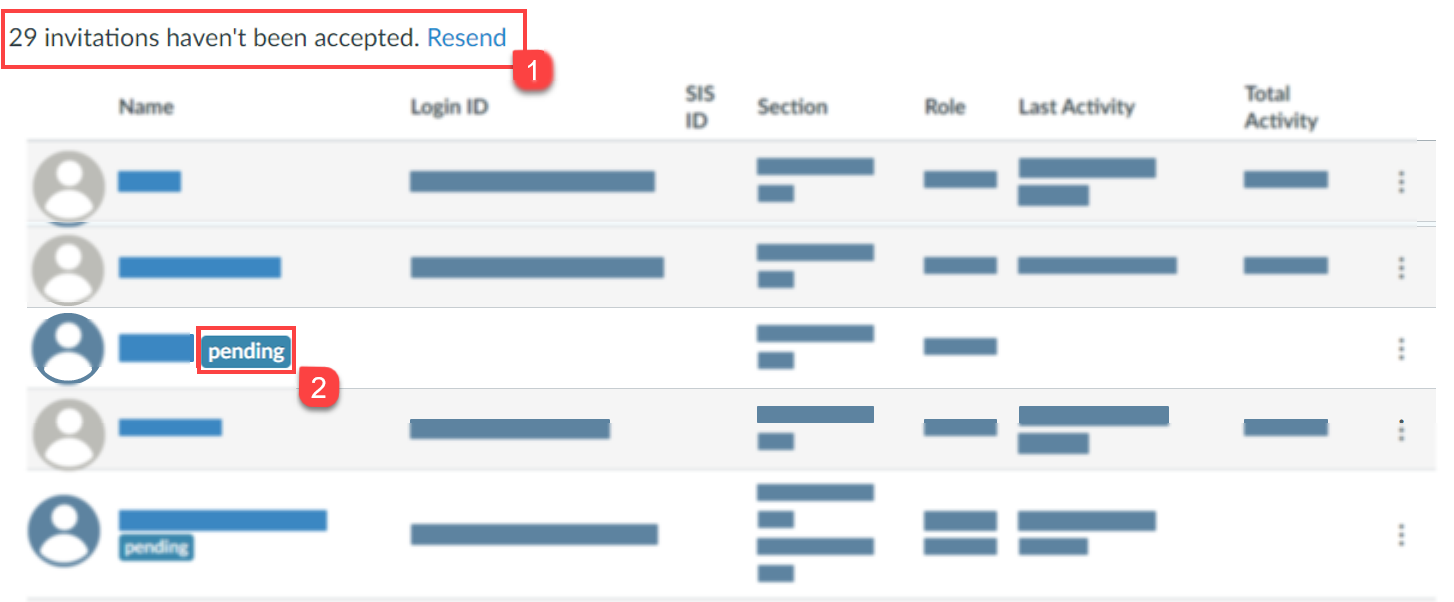
Once a course is published, users receive an invitation to the course. Users who have not yet accepted the course invitation display a pending status [1]. To resend course invitations for pending users, click the Resend link [2] at the top of the page.
Users who are inactive in the course display an inactive status. The inactive status allows you to view a user's prior activity in the course but does not allow the student to access the course.
Manage Users

To manage a user in your course, click the Options icon.
You can resend course invitations [1] and view user details[4].
If you have permission in your course, you may also be able to edit the user's course sections [2], edit the user's role [3], deactivate the user [5], remove the user from the course [6] or see student’s analytics [7].
Related Articles
How do I view all groups in a course as an instructor?
The Astria LMS has two types of groups: student groups and group sets. Student groups can be created by either an instructor or a student and are self-organized by students. Group sets are groups that you create to use for graded assignments. Open ...How do I prevent students from switching groups in self sign-up groups?
When self-sign up is enabled for a group, students are able to switch groups. To prevent students from switching groups you can disable self sign-up at any time. If a group has a student leader, the leader will be able to manage group memberships ...How do I automatically create groups in a group set?
In a group set, you can automatically create groups for users to participate in. You can also manually create groups in a group set or create groups by importing a CSV file. Open People and Add Group Set Create Group Set Name your new group by typing ...How do I add a group set in a course?
Group sets house the different groups within a course. Before creating a new group set, you may want to view the existing group sets. You can also clone an existing group set. You can also edit or delete an existing group set. Once you have created a ...What is the Dashboard?
The Dashboard is the first thing you will see when you log into your Astria LMS. The dashboard helps you to have an overview of what is happening in all your active courses. Open Dashboard You can always access it by clicking on the Dashboard link in ...